In today’s article, we’ll show you how to build decentralized applications (dapps) on OP Mainnet using Moralis’ industry-leading Web3 APIs. With our premier APIs, you can seamlessly fetch and integrate on-chain data into your projects with only single API calls. Consequently, when leveraging Moralis, you can start building OP Mainnet projects faster and more efficiently!
If you’re eager to get going with the code, here’s a little sneak peek of three endpoints for querying a wallet’s native and NFT balances, along with the price of a token:
getNativeBalance() – Fetch the native balance of any wallet:const response = await Moralis.EvmApi.balance.getNativeBalance({
“chain”: “0xa”,
“address”: “0xCBA6a2397b322CF1389f6d1adc05F75F36B20116”
}); getWalletNFTs() – Get the NFT balance of any wallet:const response = await Moralis.EvmApi.nft.getWalletNFTs({
“chain”: “0xa”,
“address”: “0xCBA6a2397b322CF1389f6d1adc05F75F36B20116”
}); getTokenPrice() – Query the price of any fungible token:const response = await Moralis.EvmApi.token.getTokenPrice({
“chain”: “0xa”,
“address”: “0x4200000000000000000000000000000000000042”
});
To explore other endpoints and our APIs in further detail, check out our official Moralis documentation page or join us in this article as we show you how to build on OP Mainnet without breaking a sweat! Now, if you want to follow along throughout this tutorial, don’t forget to sign up with Moralis. You can create an account in a heartbeat, and you’ll get instant access to our premier Web3 API suite!
Overview
We’ll kickstart today’s article by exploring the ins and outs of OP Mainnet. In doing so, we’ll explain what the network is, how it works, and cover some benefits of building dapps on OP Mainnet. From there, we’ll introduce you to Moralis and our industry-leading Optimism API suite. Once you have an overview of Moralis, we’ll jump straight into the main tutorial and show you how to build on OP Mainnet in three steps:
Step 1: Create a Moralis Account and Get Your API KeyStep 2: Choose OP Mainnet API EndpointsStep 3: Write a Script and Run the Code
To top things off, we’ll cover a brief list of OP Mainnet projects to give you some inspiration for your next dapp!

If this sounds exciting, join us in the following section as we start by discovering what OP Mainnet is!
What is OP Mainnet?
OP Mainnet – also known as Optimism – launched in 2021, and it’s a low-cost and lightning-fast ETH layer-2 (L2) scaling solution. This blockchain network serves as a foundation for a vast ecosystem that encompasses a wide array of decentralized applications (dapps). This includes cryptocurrency wallets, decentralized exchanges (DEXs), and other prominent Web3 projects!

So, why should you build dapps on OP Mainnet? To answer this question, let’s look at three benefits of this network:
Speed and Efficiency: OP Mainnet leverages “optimistic rollup” technology to bundle hundreds of off-chain operations into a single Ethereum transaction. In doing so, the network can significantly improve Ethereum’s scalability by facilitating quicker transactions at a low cost. This makes OP Mainnet a more efficient and cost-effective solution for end users and developers alike. Innovative Infrastructure: Through OP Mainnet’s Superchain project, the network seeks to maximize interoperability and composability between blockchains using the OP Stack. In doing so, OP Mainnet aims to integrate multiple siloed L2 scaling solutions into a single, unified layer. Scalable Ecosystem: With EVM-equivalence, all Ethereum dapps will work perfectly on OP Mainnet. This means you can use the same established development tools to build on OP Mainnet as you would on Ethereum.
That gives you an overview of OP Mainnet and the benefits of this network. In the next section, we’ll introduce you to the easiest way to build OP Mainnet dapps: Moralis!
Easiest Way to Build on OP Mainnet – Introducing Moralis
Moralis is an industry-leading Web3 API provider, and its toolset of fully OP Mainnet-compatible APIs currently powers blockchain and crypto applications for millions of users worldwide!
In Moralis’ suite of Web3 APIs, you’ll find more than ten interfaces for various use cases, including the Wallet API, NFT API, and Token API. With these premier APIs, it’s possible to query blockchain data with only single lines of code. As such, you can seamlessly build OP Mainnet dapps both faster and more efficiently using Moralis.
However, what makes Moralis stand out compared to the competition? To answer this question, let’s explore three benefits of our premier Web3 APIs:
Comprehensive: All our API responses are enriched with metadata, transaction decodings, market data, address labels, and much more from multiple sources. This enables us to provide the industry’s most comprehensive APIs that are designed with the outcome in mind, minimizing the number of calls you need to build Web3 projects. Simple: Moralis is the only Web3 API provider that’s simple and intuitive to use. All of our requests and responses adhere to the same standard and structure across various APIs tailored for specific use cases. Trusted: Our Web3 APIs are trusted by hundreds of thousands of developers and enterprise customers like MetaMask, Polygon, Delta, etc. So, if you want to emulate some of the Web3 industry’s biggest names, consider using Moralis.
If you’d like to explore all our interfaces, check out the official Web3 API page!
Also, did you know that you can access our Web3 APIs for free? Simply sign up with Moralis, and you’ll be able to build OP Mainnet dapps without breaking a sweat!
3-Step Tutorial: How to Build on OP Mainnet
Now, with an overview of Moralis, let’s dive into the main section of this guide and show you how to build on OP Mainnet in three straightforward steps:
Step 1: Create a Moralis Account and Get Your API KeyStep 2: Choose OP Mainnet API EndpointsStep 3: Write a Script and Run the Code
However, before you can get going, you need to deal with a couple of prerequisites!
Prerequisites
Moralis’ Web3 APIs are compatible with multiple programming languages, including Python, Go, etc. However, in this tutorial, we’ll be using JavaScript and NodeJS. As such, before you continue, make sure you have the following ready:
Step 1: Create a Moralis Account and Get Your API Key
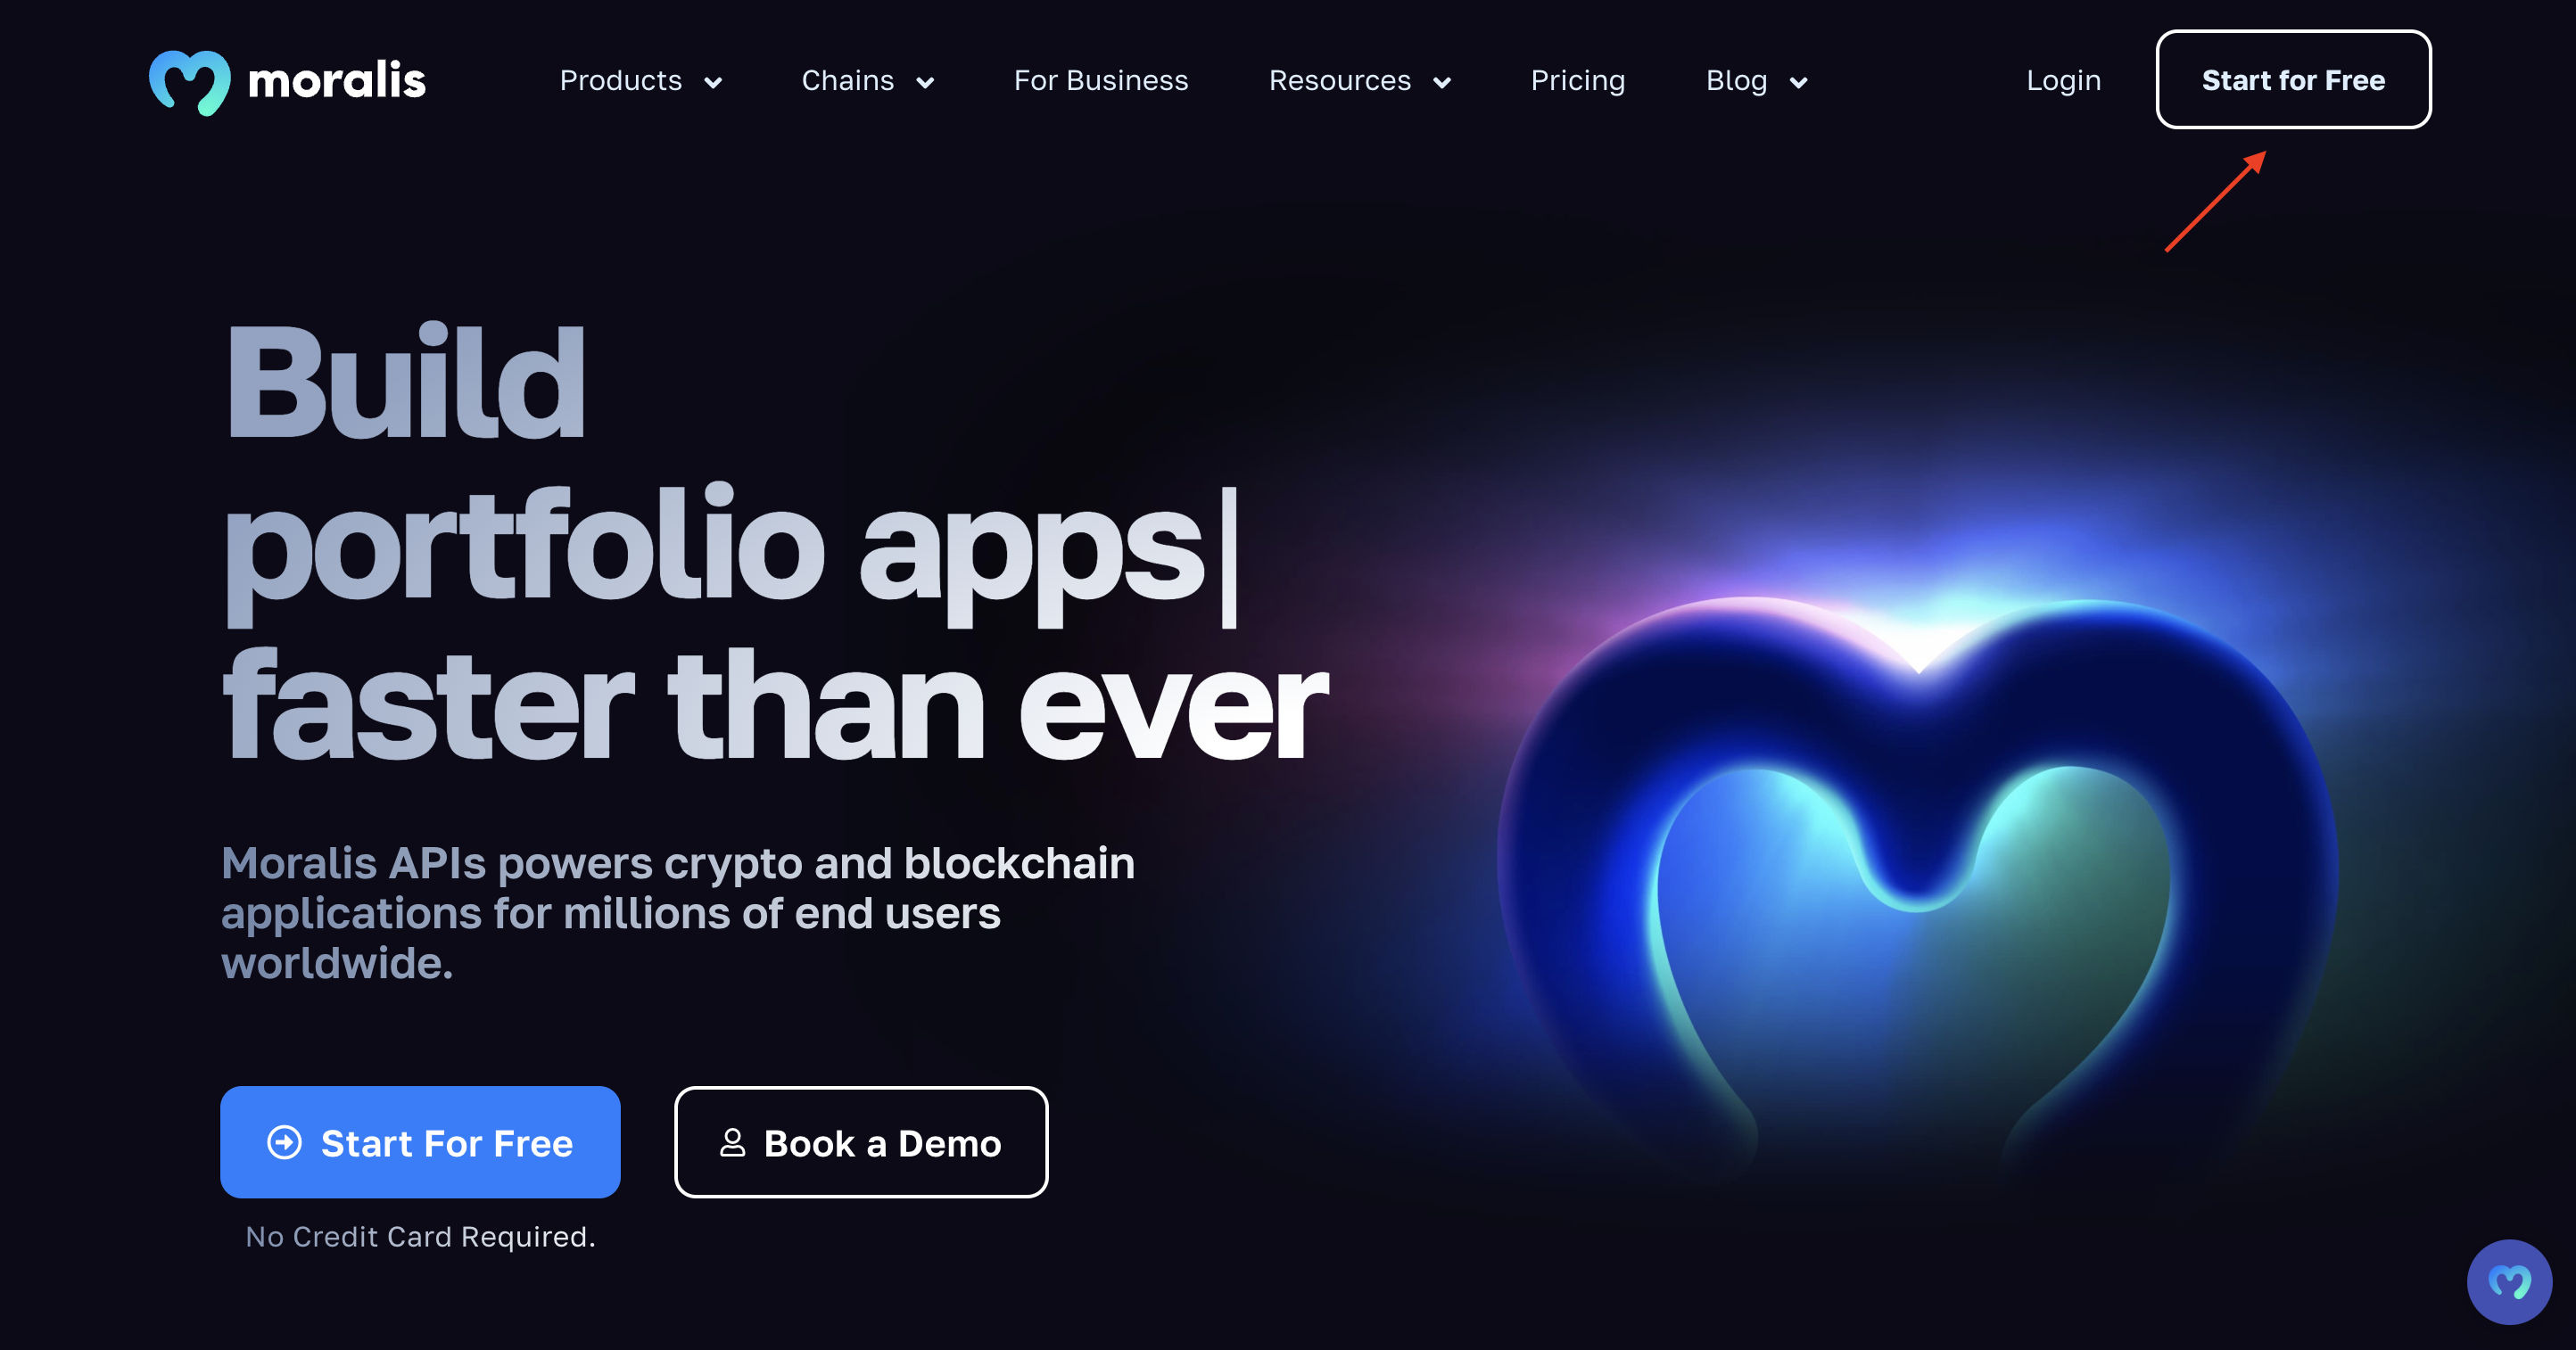
The first thing you’ll need is a Moralis account. As such, if you haven’t already, click on the ”Start for Free” button at the top right of Moralis’ homepage and set up an account:
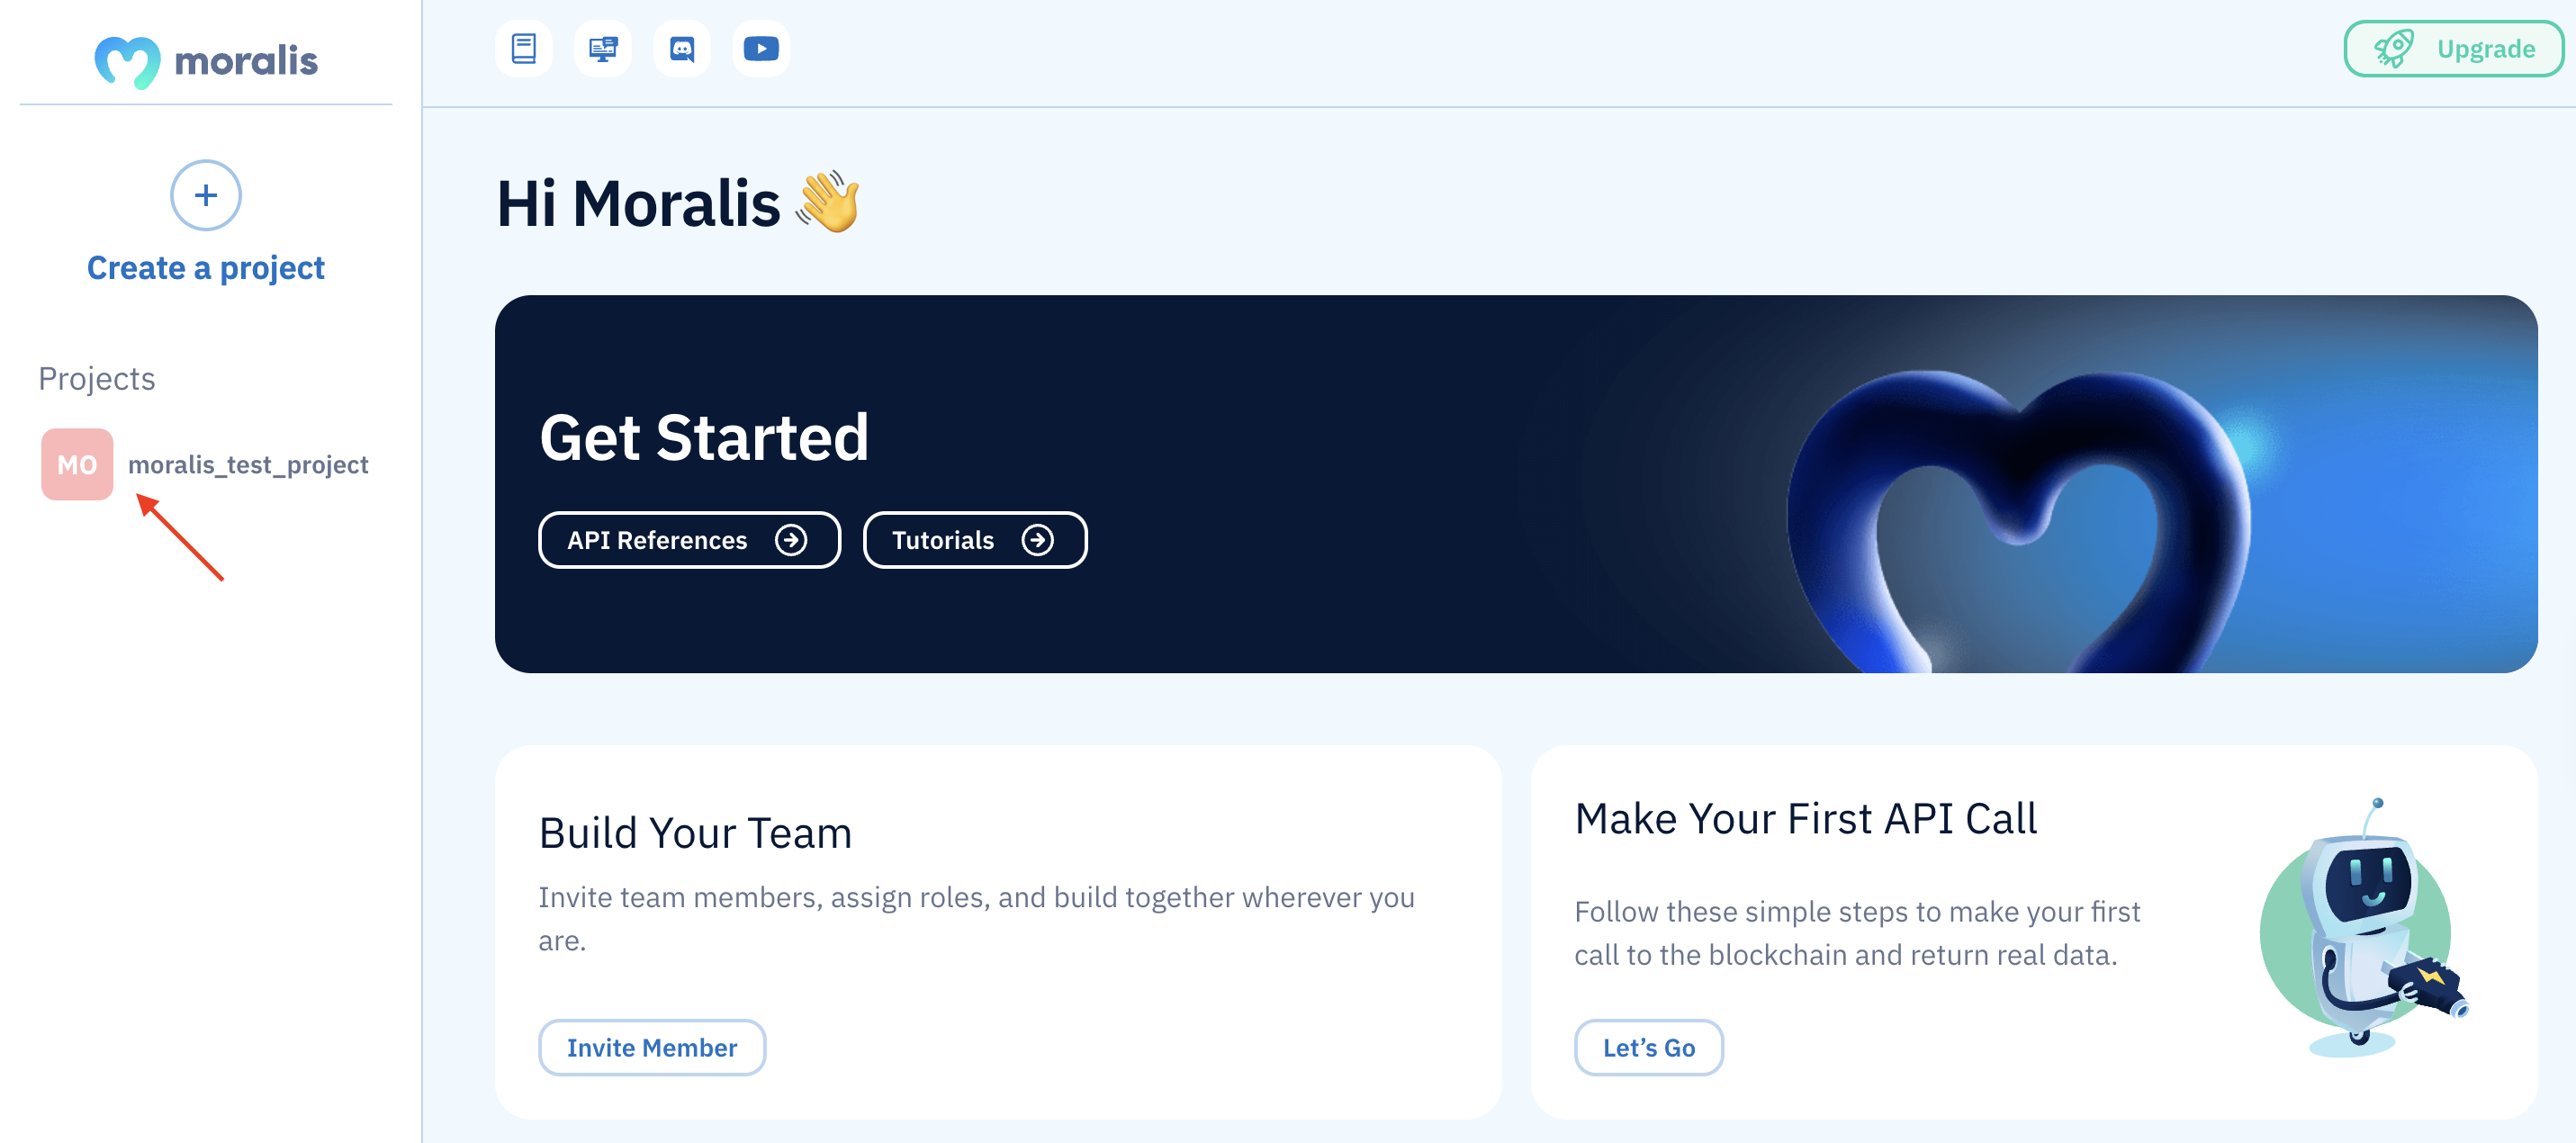
After creating an account and logging in, you’ll notice that Moralis has automatically set up a new project for you:
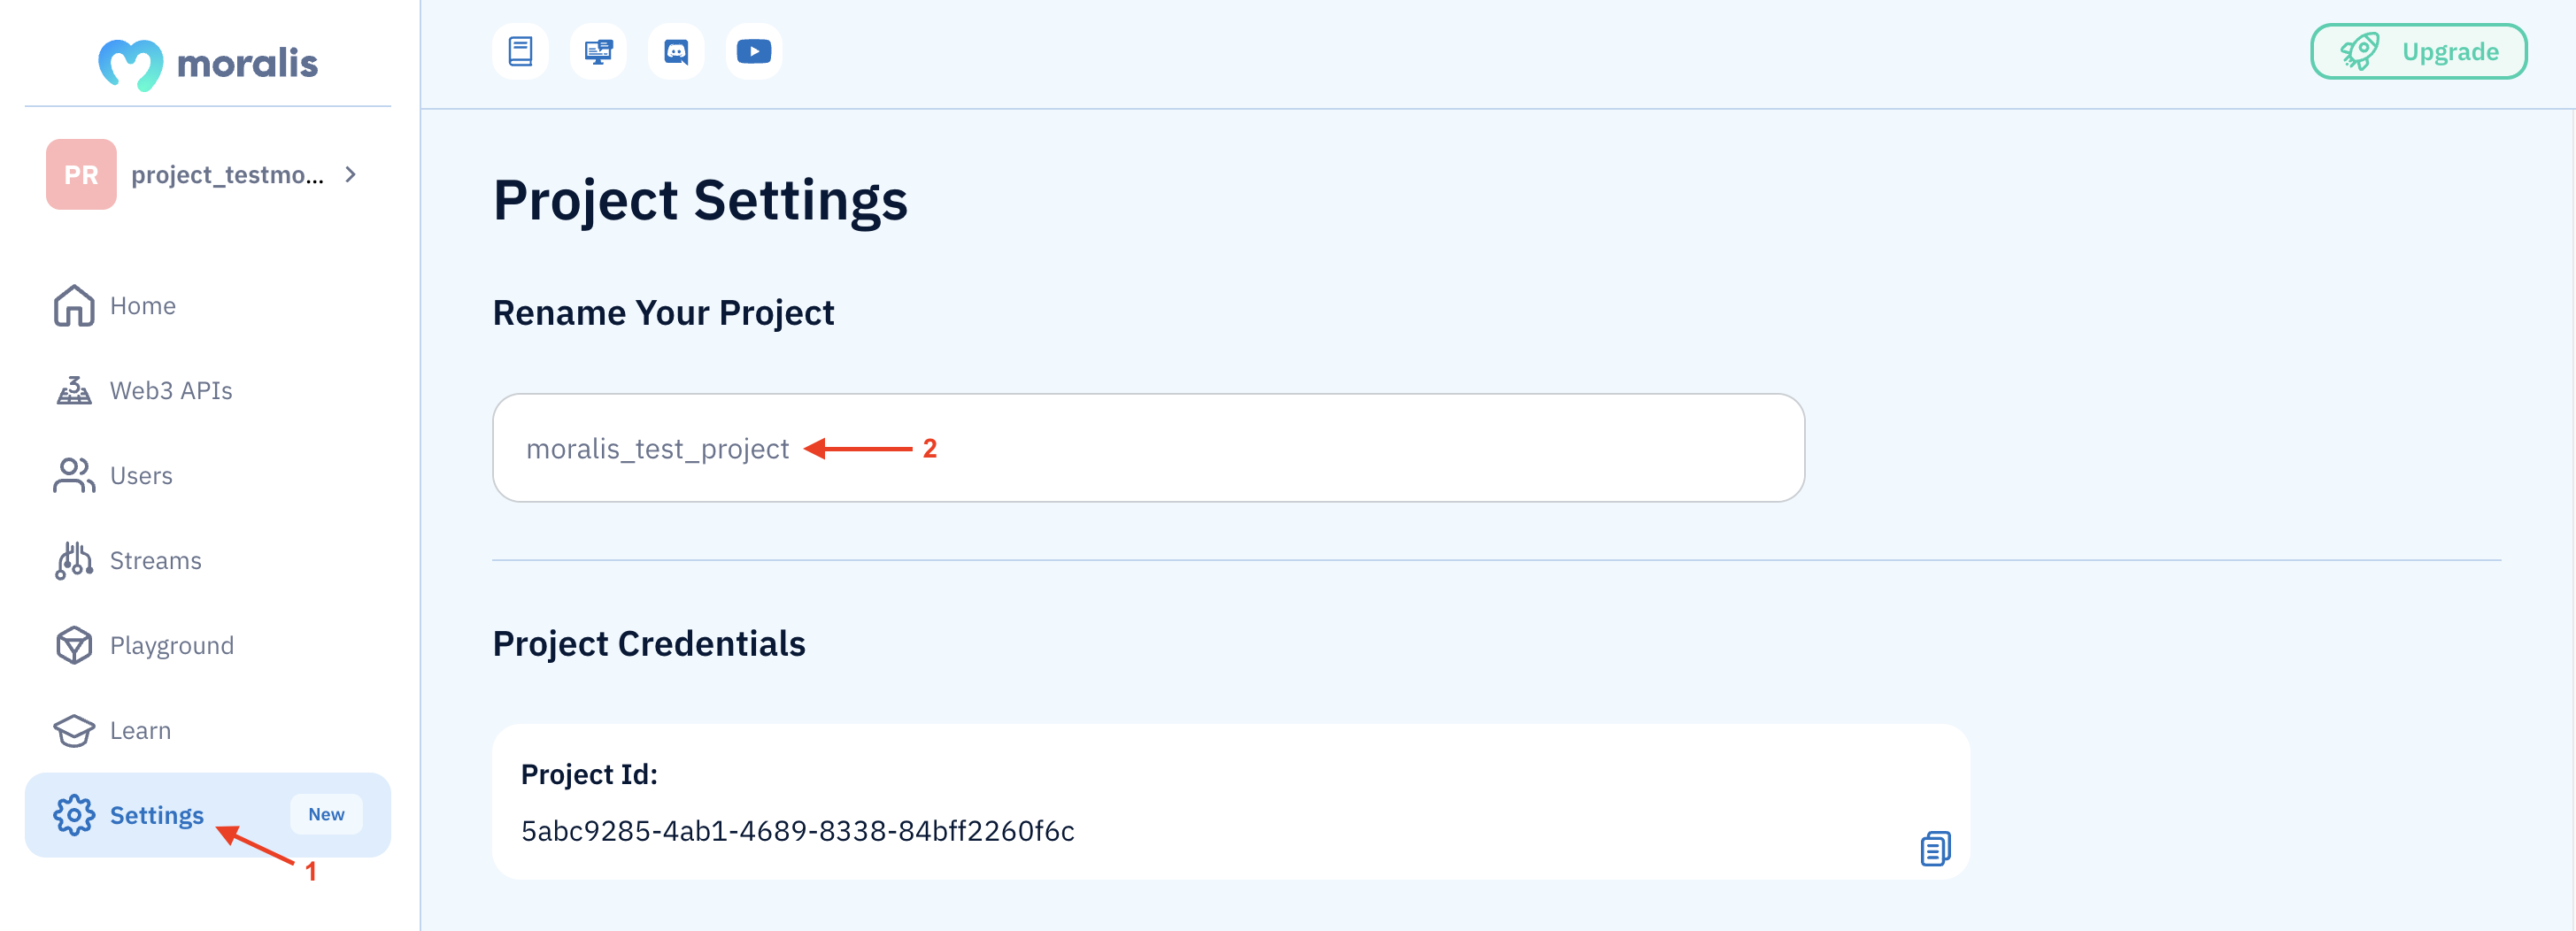
The first thing you may want to do is rename the project under ”Settings”:
Next, scroll down to the ”API Keys” section and copy your Moralis API key:
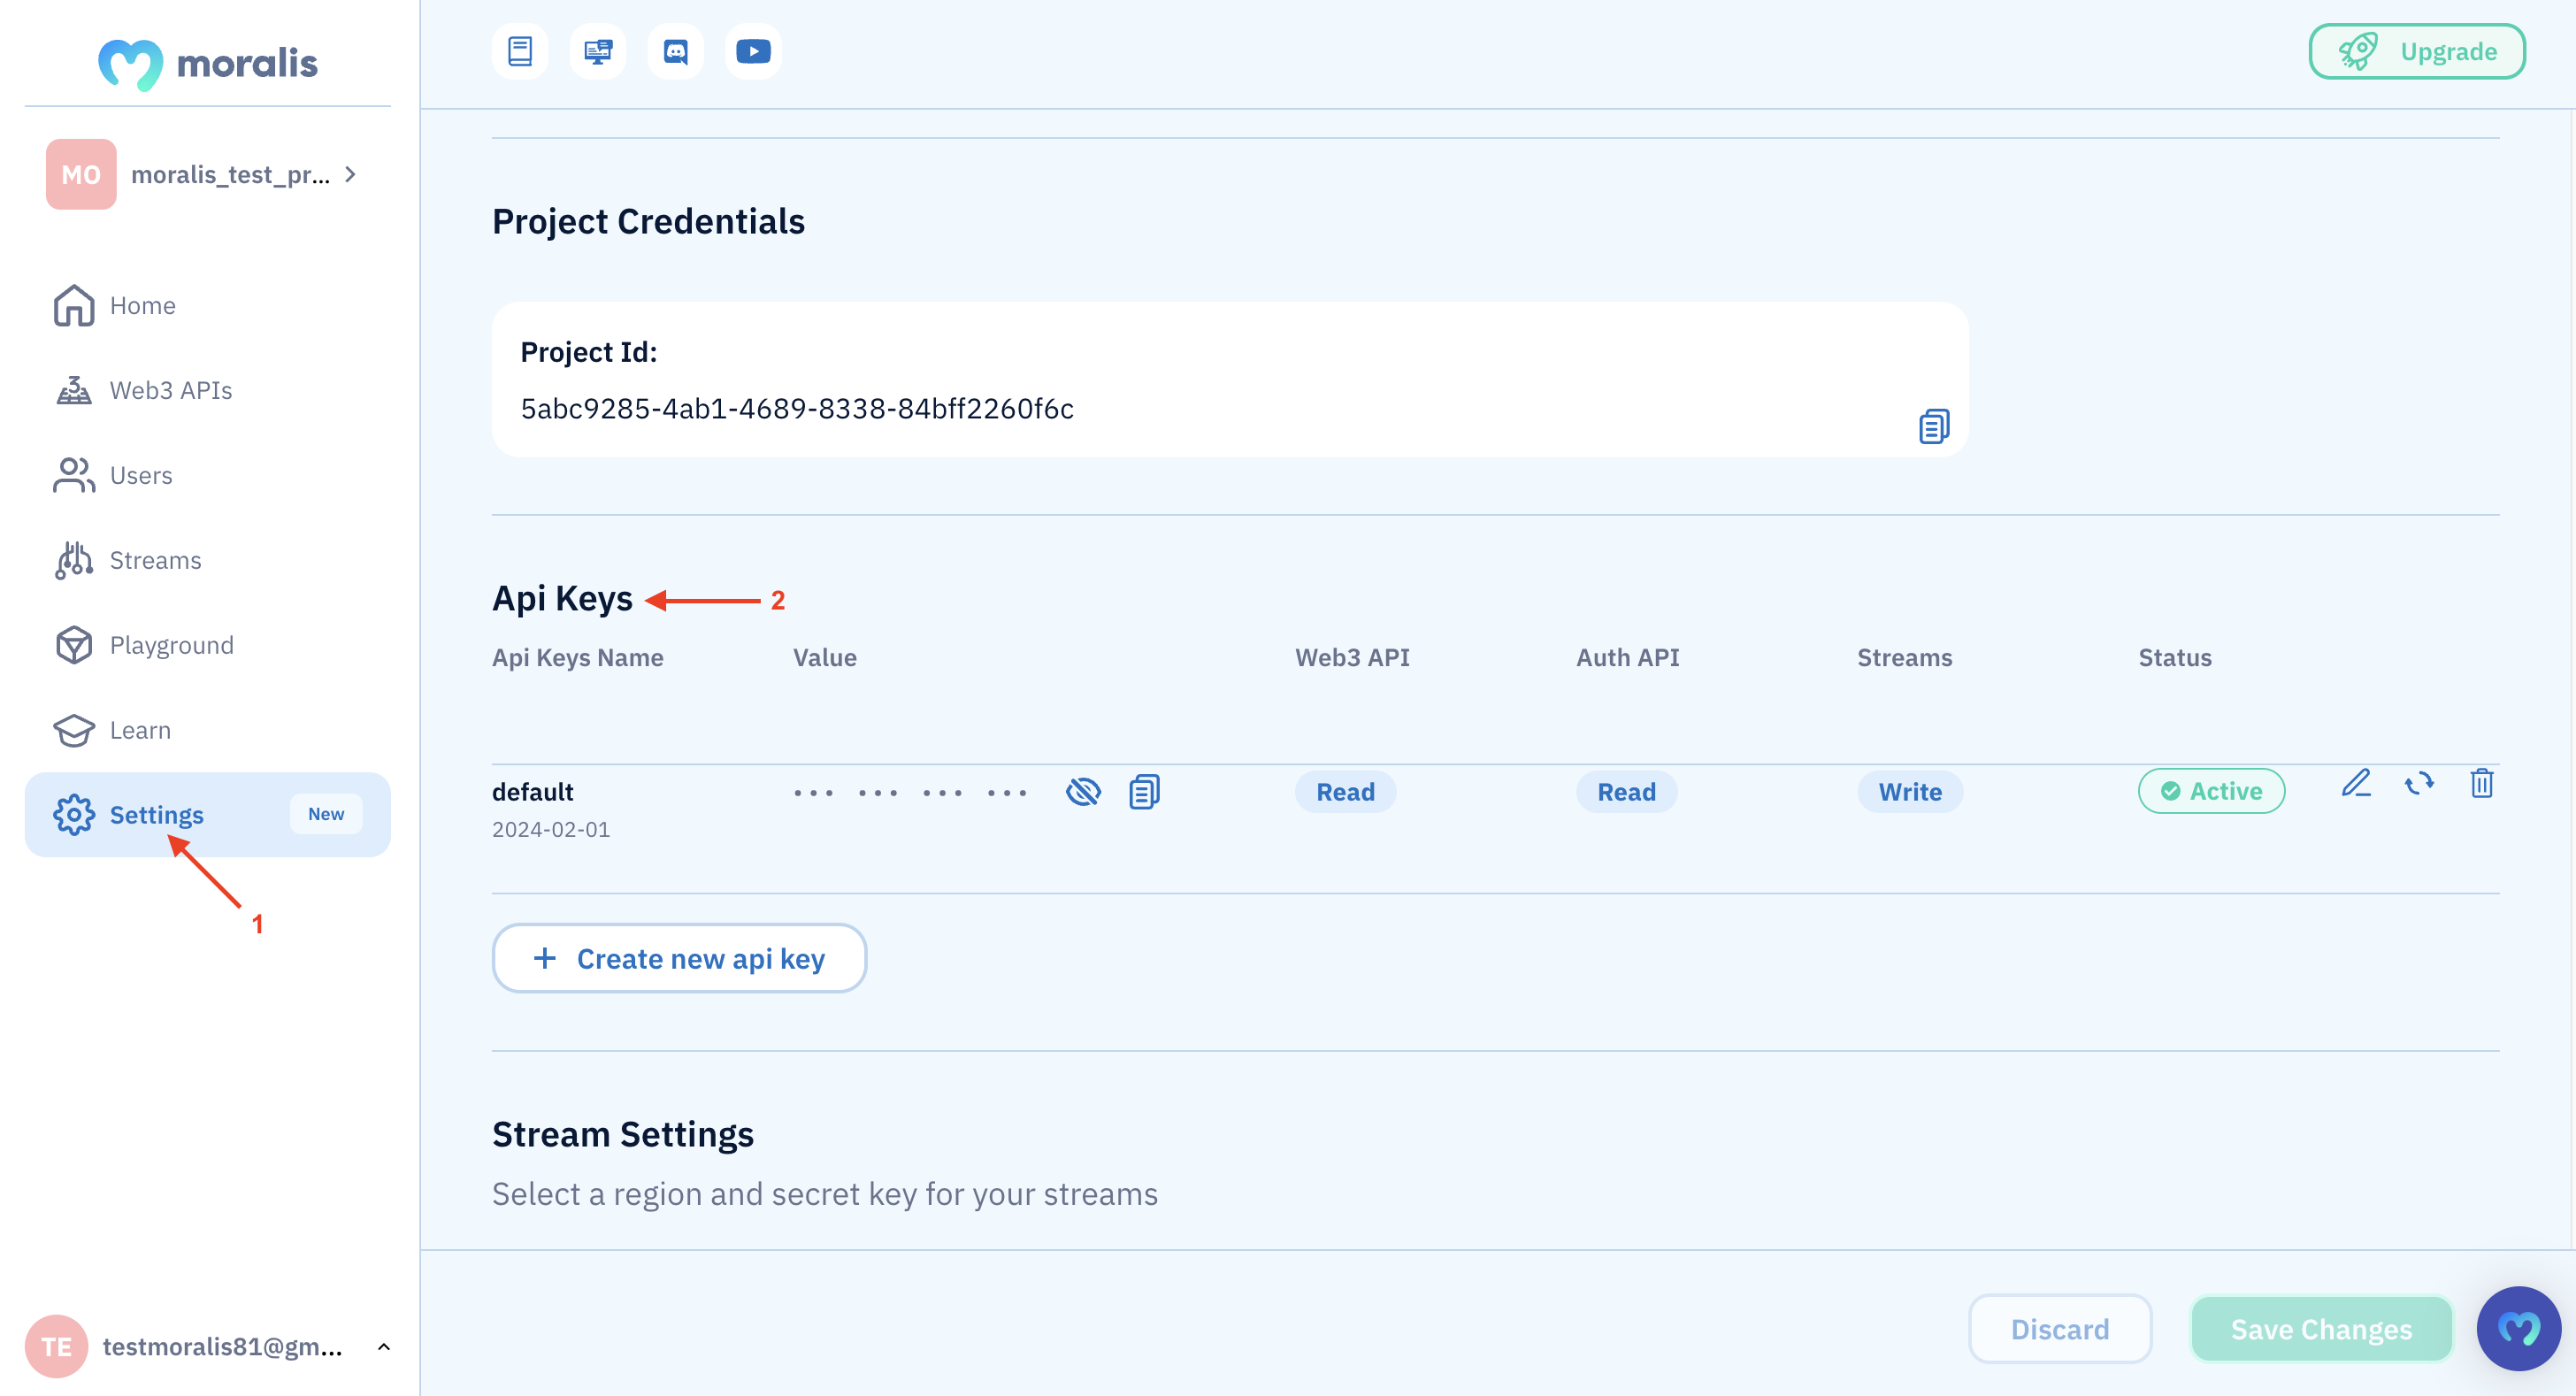
Please keep it for now, as you’ll need it in the third step!
Step 2: Choose OP Mainnet API Endpoints
In this section, we’ll dive a bit deeper into the various APIs of Moralis to give you an overview of what OP Mainnet projects you can build with our premier tools. More specifically, we’ll focus on the following three APIs and their respective endpoints:
Wallet API NFT APIToken API
So, let’s kick this off by exploring the ins and outs of Moralis’ Wallet API!
Wallet API
Moralis’ Wallet API is the ultimate tool for building cryptocurrency wallets and integrating wallet functionality into OP Mainnet projects. The Wallet API supports 500+ million addresses across the biggest blockchains, including Ethereum, Polygon, BSC, and, of course, OP Mainnet!
With this industry-leading tool, you can effortlessly query the native balance, NFT balance, profile data, token transfers, transactions, and more of any cryptocurrency address. As such, with the Wallet API, you can build everything from portfolio trackers to cryptocurrency wallets on OP Mainnet without breaking a sweat.
To highlight the accessibility of this tool, here are three prominent endpoints you’ll likely find helpful when building dapps:
getNativeBalance() – Query the native balance of any wallet address: const response = await Moralis.EvmApi.balance.getNativeBalance({
“chain”: “0xa”,
“address”: “0xCBA6a2397b322CF1389f6d1adc05F75F36B20116”
});
getNativeBalance() response:
{
“balance”: “50640324378835108031”
} getWalletTransactions() – Fetch the native transaction history of any wallet:const response = await Moralis.EvmApi.transaction.getWalletTransactions({
“chain”: “0xa”,
“address”: “0x2a82ae142b2e62cb7d10b55e323acb1cab663a26”
});
getWalletTransactions() response:
[
//…
{
“hash”: “0x6cbb692563bfb4adfa0850a4d68cbed848ba9be2b73fe04f42a49b81305e3eab”,
“nonce”: “13”,
“transaction_index”: “5”,
“from_address”: “0xcd3031fb7da6c6764466a6f77ec74e52a4cea810”,
“from_address_label”: null,
“to_address”: “0x2a82ae142b2e62cb7d10b55e323acb1cab663a26”,
“to_address_label”: null,
“value”: “27200000”,
“gas”: “21000”,
“gas_price”: “50000000”,
“input”: “0x”,
“receipt_cumulative_gas_used”: “363490”,
“receipt_gas_used”: “21000”,
“receipt_contract_address”: null,
“receipt_root”: null,
“receipt_status”: “0”,
“block_timestamp”: “2023-11-18T09:10:23.000Z”,
“block_number”: “112349923”,
“block_hash”: “0xd92193788b4f8ed5c991819ecf22433a4a5eca8b45974c90115c852635dcc4d3”,
“transfer_index”: [
112349923,
5
]
},
//…
] getWalletTokenBalances() – Get the token balances of any wallet: const response = await Moralis.EvmApi.token.getWalletTokenBalances({
“chain”: “0xa”,
“address”: “0x2a82ae142b2e62cb7d10b55e323acb1cab663a26”
});
getWalletTokenBalances() response:
[
{
“token_address”: “0x7f5c764cbc14f9669b88837ca1490cca17c31607”,
“symbol”: “USDC”,
“name”: “USD Coin”,
“logo”: null,
“thumbnail”: null,
“decimals”: 6,
“balance”: “2000000”,
“possible_spam”: false,
“verified_contract”: true
},
{
“token_address”: “0x4200000000000000000000000000000000000042”,
“symbol”: “OP”,
“name”: “Optimism”,
“logo”: null,
“thumbnail”: null,
“decimals”: 18,
“balance”: “1294044371320286807123702580”,
“possible_spam”: false,
“verified_contract”: true
},
//…
]
NFT API
The NFT API supports over three million collections across ten+ EVM-compatible chains, including everything from well-established projects to tokens that dropped just seconds ago. Consequently, this tool takes care of all your NFT data-related development needs!
With the NFT API, you only need single API calls to seamlessly fetch real-time NFT transfers, on-chain price data, enriched metadata, and more. So, when working with this premier tool, you can build everything from NFT marketplaces to Web3 games with ease.
Here are three prominent endpoints to highlight the accessibility of our NFT API:
getNFTMetadata() – Get the metadata of any NFT: const response = await Moralis.EvmApi.nft.getNFTMetadata({
“chain”: “0xa”,
“address”: “0xB8Df6Cc3050cC02F967Db1eE48330bA23276A492”,
“tokenId”: “1”
});
getNFTMetadata() response:
{
“amount”: “1”,
“token_id”: “1”,
“token_address”: “0xb8df6cc3050cc02f967db1ee48330ba23276a492”,
“contract_type”: “ERC721”,
“owner_of”: “0xb09fa44ef3bcbd1bf2d35d5644a19e188d4c05f6”,
“last_metadata_sync”: “2024-02-01T15:09:43.956Z”,
“last_token_uri_sync”: “2024-02-01T15:09:42.794Z”,
“metadata”: “{\”name\”:\”Optipunk #1\”,\”description\”:\”10,000 unique collectible characters with proof of ownership stored on Optimism\”,\”attributes\”:[{\”trait_type\”:\”Type\”,\”value\”:\”Male\”},{\”trait_type\”:\”Accessory\”,\”value\”:\”Smile\”},{\”trait_type\”:\”Accessory\”,\”value\”:\”Mohawk\”}],\”image\”:\”ipfs://QmbAhtqQqiSQqwCwQgrRB6urGc3umTskiuVpgX7FvHhutU/1.png\”}”,
“block_number”: “97749”,
“block_number_minted”: “97749”,
“name”: “OptiPunk”,
“symbol”: “OPPUNK”,
“token_hash”: “364af8044f93145cf5859151b46223a3”,
“token_uri”: “https://ipfs-metadata.moralis.io:2053/ipfs/QmZYqgu73bpovLt7Y4kYfCPUbbgdRfvcsja8YZsprKismB/1”,
“minter_address”: “0xb09fa44ef3bcbd1bf2d35d5644a19e188d4c05f6”,
“verified_collection”: false,
“possible_spam”: false
} getWalletNFTs() – Fetch the NFT balance of a wallet:const response = await Moralis.EvmApi.nft.getWalletNFTs({
“chain”: “0xa”,
“address”: “0xCBA6a2397b322CF1389f6d1adc05F75F36B20116”
});
getWalletNFTs() response:
[
{
“amount”: “1”,
“token_id”: “3569948”,
“token_address”: “0xd12999440402d30f69e282d45081999412013844”,
“contract_type”: “ERC721”,
“owner_of”: “0xcba6a2397b322cf1389f6d1adc05f75f36b20116”,
“last_metadata_sync”: “2024-02-01T15:03:42.174Z”,
“last_token_uri_sync”: “2024-02-01T15:03:42.039Z”,
“metadata”: “//…”,
“block_number”: “107697133”,
“block_number_minted”: “107306857”,
“name”: “Omnichain Adventures”,
“symbol”: “OMNIA”,
“token_hash”: “f50ea59436c7eda79995a4e694d53f72”,
“token_uri”: “https://yvsbrs5apkpplrjba65gcet4zbe3wsv6i5y3e44vgxcunjwopsmq.arweave.net/xWQYy6B6nvXFIQe6YRJ8yEm7Sr5HcbJzlTXFRqbOfJk”,
“minter_address”: “0x8caf185283211beab492601825fee0b44f8633aa”,
“verified_collection”: false,
“possible_spam”: false
}
] getNFTOwners() – Query an array of all NFT owners for a given contract:const response = await Moralis.EvmApi.nft.getNFTOwners({
“chain”: “0xa”,
“address”: “0xB8Df6Cc3050cC02F967Db1eE48330bA23276A492”
});
getNFTOwners() response:
[
{
“amount”: “1”,
“token_id”: “2329”,
“token_address”: “0xb8df6cc3050cc02f967db1ee48330ba23276a492”,
“contract_type”: “ERC721”,
“owner_of”: “0x0331969e189d63fbc31d771bb04ab44227d748d8”,
“last_metadata_sync”: “2024-02-01T15:10:32.987Z”,
“last_token_uri_sync”: “2024-02-01T15:10:31.531Z”,
“metadata”: “//…”,
“block_number”: “135838”,
“block_number_minted”: “135838”,
“name”: “OptiPunk”,
“symbol”: “OPPUNK”,
“token_hash”: “6206b15eef897e716a8f943c61718039”,
“token_uri”: “https://ipfs-metadata.moralis.io:2053/ipfs/QmZYqgu73bpovLt7Y4kYfCPUbbgdRfvcsja8YZsprKismB/2329”,
“minter_address”: “0x0331969e189d63fbc31d771bb04ab44227d748d8”,
“verified_collection”: false,
“possible_spam”: false
},
//…
]
Token API
The Token API is the industry’s most comprehensive tool for fungible token data, supporting every single token across more than ten blockchains, including OP Mainnet, Ethereum, Polygon, and BNB Smart Chain!
With the Token API, you can seamlessly fetch prices, transfers, balances, metadata, and much more for any ERC-20 token. As such, when using this premier API, you can build everything from DEXs to token explorers in no time.
To highlight the accessibility of the Token API, here are three endpoints you’ll find helpful when building OP Mainnet dapps:
getTokenPrice() – Get the price of any fungible token: const response = await Moralis.EvmApi.token.getTokenPrice({
“chain”: “0xa”,
“address”: “0x4200000000000000000000000000000000000042”
});
getTokenPrice() response:
{
“tokenName”: “Optimism”,
“tokenSymbol”: “OP”,
“tokenLogo”: null,
“tokenDecimals”: “18”,
“nativePrice”: {
“value”: “1346688388542655”,
“decimals”: 18,
“name”: “Ether”,
“symbol”: “ETH”,
“address”: “0x4200000000000000000000000000000000000006”
},
“usdPrice”: 3.357083520606333,
“usdPriceFormatted”: “3.357083520606332971”,
“exchangeName”: “Uniswap v3”,
“exchangeAddress”: “0x1F98431c8aD98523631AE4a59f267346ea31F984”,
“tokenAddress”: “0x4200000000000000000000000000000000000042”,
“priceLastChangedAtBlock”: “115945253”,
“verifiedContract”: true
} getTokenMetadata() – Fetch the metadata of any token:const response = await Moralis.EvmApi.token.getTokenMetadata({
“chain”: “0xa”,
“addresses”: [
“0x4200000000000000000000000000000000000042”
]
});
getTokenMetadata() response:
[
{
“address”: “0x4200000000000000000000000000000000000042”,
“address_label”: null,
“name”: “Optimism”,
“symbol”: “OP”,
“decimals”: “18”,
“logo”: null,
“logo_hash”: null,
“thumbnail”: null,
“block_number”: “0”,
“validated”: 1,
“created_at”: null,
“possible_spam”: false,
“verified_contract”: true
}
] getTokenTransfers() – Query all transactions for a given token contract: const response = await Moralis.EvmApi.token.getTokenTransfers({
“chain”: “0xa”,
“address”: “0x4200000000000000000000000000000000000042”
});
getTokenTransfers() response:
[
{
“token_name”: “Optimism”,
“token_symbol”: “OP”,
“token_logo”: null,
“token_decimals”: “18”,
“from_address”: “0x666936a007c8c2e70dd5aae9151fd50de858fb16”,
“from_address_label”: null,
“to_address”: “0x2580fe0cdd3a2300f4fe9637e7d4b44d47f1f63b”,
“to_address_label”: null,
“address”: “0x4200000000000000000000000000000000000042”,
“block_hash”: “0x4f99ed7e331b422c87d73eed2a60e98417d072ed64d0ceab57e7479d76aeb58b”,
“block_number”: “115945333”,
“block_timestamp”: “2024-02-09T14:37:23.000Z”,
“transaction_hash”: “0xf8e82cbe28afb6e3adea9ef0c34132588ff29a8cc16b0cc48cf516efc0a68d05”,
“transaction_index”: 10,
“log_index”: 48,
“value”: “600000000000000000000”,
“possible_spam”: false,
“value_decimal”: “600”,
“verified_contract”: true
},
]
Step 3: Write a Script and Run the Code
Once you choose the appropriate endpoints for your particular project, all that remains is for you to call them. And we’ll show you exactly how to do so in this final step of our tutorial!
In this case, we’ll use the getWalletTokenBalances() endpoint as an example. However, if you’re interested in any other endpoint, worry not, as you can follow pretty much the same steps for all endpoints.
Start by setting up a folder in your IDE and run the terminal command below to initialize a new project:
npm init
Next, run the commands below in the terminal to install the Moralis SDK:
npm install moralis @moralisweb3/common-evm-utils
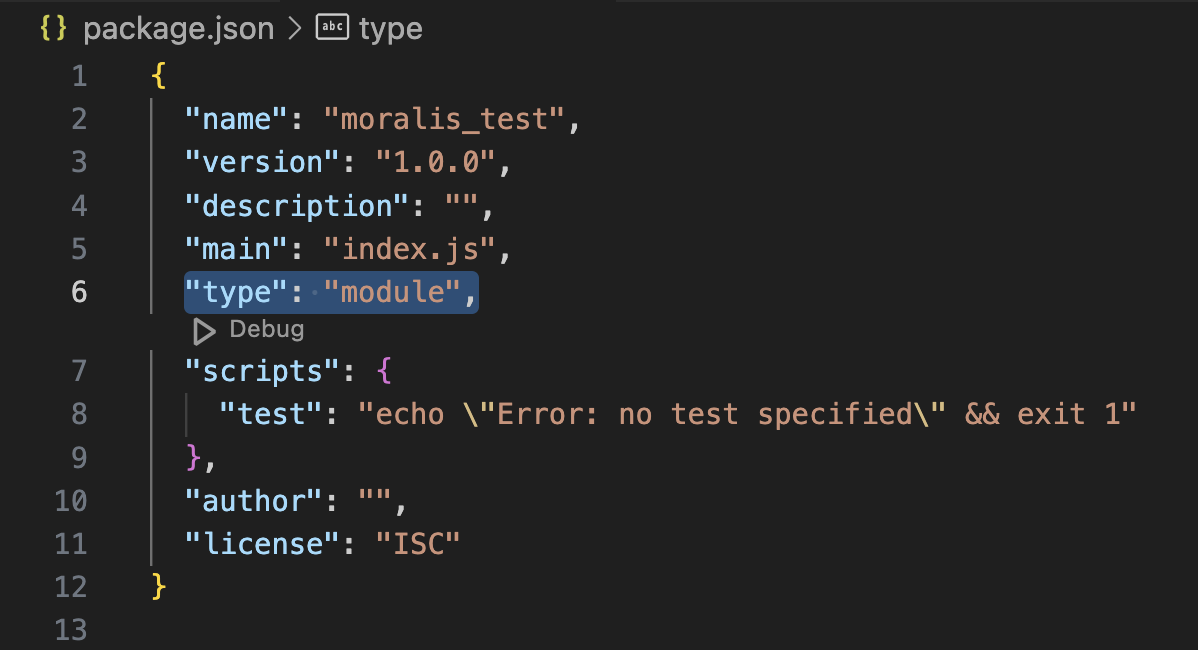
From here, open your ”package.json” file and add ”type”: ”module”:
You can then create a new ”index.js” file and add the following code:
import Moralis from ‘moralis’;
try {
await Moralis.start({
apiKey: “YOUR_API_KEY”
});
const response = await Moralis.EvmApi.token.getWalletTokenBalances({
“chain”: “0xa”,
“address”: “0x2a82ae142b2e62cb7d10b55e323acb1cab663a26”
});
console.log(response.raw);
} catch (e) {
console.error(e);
}
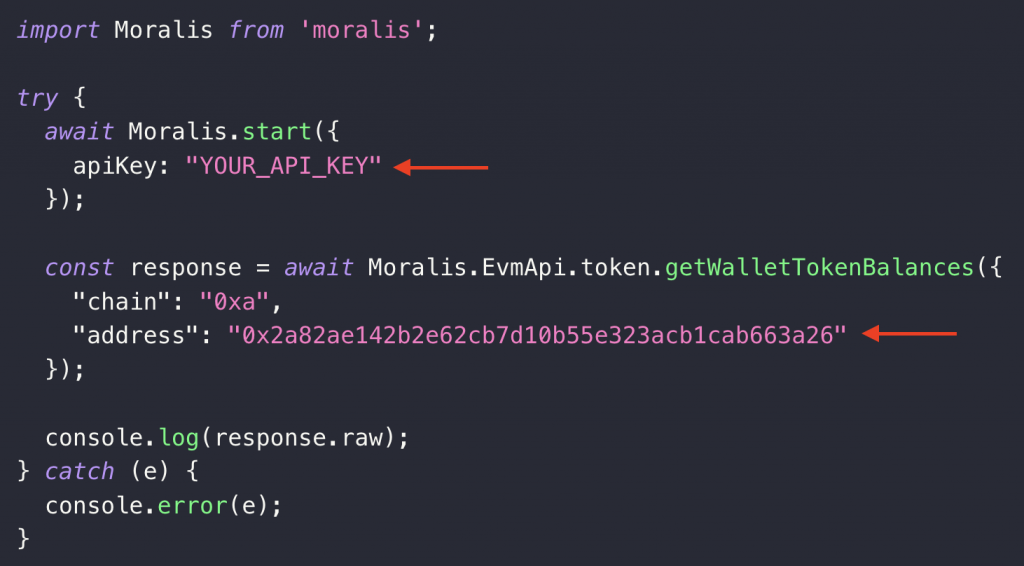
You now need to make a few small configurations to the code. First of all, you need to replace YOUR_API_KEY with the key you copied during the first step. Next, you also need to configure the address parameter to fit your query:
From here, you only need to run the code. To do so, open a new terminal and execute the command below in the project’s root folder:
node index.js
In return, you’ll get a response containing an array of the token balances of the specified address. It will look something like this:
[
{
“token_address”: “0x7f5c764cbc14f9669b88837ca1490cca17c31607”,
“symbol”: “USDC”,
“name”: “USD Coin”,
“logo”: null,
“thumbnail”: null,
“decimals”: 6,
“balance”: “2000000”,
“possible_spam”: false,
“verified_contract”: true
},
{
“token_address”: “0x4200000000000000000000000000000000000042”,
“symbol”: “OP”,
“name”: “Optimism”,
“logo”: null,
“thumbnail”: null,
“decimals”: 18,
“balance”: “1294044371320286807123702580”,
“possible_spam”: false,
“verified_contract”: true
},
//…
]
That’s it! You now know how to query everything from wallet balances to token transactions using Moralis’ premier Web3 API suite. In turn, you’re now ready to take your development endeavors to the next level and start building OP Mainnet dapps!
Dapp Ideas – Exploring a List of Optimism Projects
With a better understanding of how you can build dapps on OP Mainnet using Moralis’ Web3 APIs, you might now be looking for some inspiration for your next project. Consequently, we’ll take this section to explore five prominent OP Mainnet projects:
If you want to explore projects not covered above, please check out our comprehensive list of top Optimism dapps on Moralis’ Web3 Wiki!
Summary: How to Build on OP Mainnet
In today’s article, we showed you how to build on OP Mainnet with Moralis in three simple steps:
Step 1: Create a Moralis Account and Get Your API KeyStep 2: Choose OP Mainnet API EndpointsStep 3: Write a Script and Run the Code
If you have followed along this far, you now know how to build dapps on Optimism seamlessly! Also, if you haven’t already, don’t forget to sign up with Moralis. You can sign up with the click of a few buttons, and you’ll gain instant access to our industry-leading OP Mainnet API suite so you can start building dapps faster and more efficiently!


